Category Archives: Container Gardening

Repurposed Pantry Jars As Party Favors

Hello crafters! A while back I posted a project titled, Repurposed Jars for the Holidays. It was a big hit on my blog so I decided to repurpose MORE jars but this time as tiny terrariums. I think they’d be awesome as wedding favors!

OLYMPUS DIGITAL CAMERA

Here’s what you’ll need:

  • Jars from your pantry
  • Craft store acrylic paint
  • Tiny succulents
  • Potting soil
  • Small pebbles
  • 18 gauge aluminum wire
  • Card stock paper
  • Tiny spoon or twig
  • Wire cutter
  • Pencil

With the exception of the jars, succulents and potting soil, you can pick up all project ingredients from your craft store. The succulents and potting soil can be purchased at your local plant nursery.

Here’s how you do it:

  1. Empty, clean and remove label from the jar.
  2. Paint jar lid your favorite color.
  3. Add about 1/2 inch of soil to the bottom of the jar.
  4. Remove the succulent from the store container and remove any excess soil that is around the root system. Don’t worry about hurting these little guys, they’re super resilient.
  5. Insert the succulent into jar and secure the roots of the succulent in the soil using a small spoon or twig.
  6. Add a layer of pebbles.
  7. Cut a section of wire to wrap and twist around the neck of the jar.
  8. Using a pencil, curl the other end of the wire around the pencil to create a coil – this will hold the name tag.
  9. Create a name tag with card stock paper, slip it in the coiled end of the wire and your done!

OLYMPUS DIGITAL CAMERA

This project is super easy and inexpensive to make. And best of all, it makes a super and unique gift. Oh, and caring for these little lovelies is a breeze:

Check every couple of days to see if your terrarium needs water. If it is dry add a tiny bit of water.

If your terrarium is closed, take off the top every couple of days to air it out. If you see lots of condensation or have added too much water, leave the top off until it has had a chance to dry out.

Pull off any leaves that show signs of yellowing or damage and prune plants if they grow too large.

Don’t fertilize your terrarium because you don’t want to encourage growth.

Happy crafting!


Chalkboard Flower Pot Easter Gifts

Chalkboard paint is so much fun to work with and it allows you countless ways to produce unique and functional pieces like this project, Birch Log Table Numbers.

I have a giant pile of unused terra-cotta flower pots so putting them to good use, I cracked open a can of chalkboard paint and created these simple gifts for the upcoming Easter holiday.

OLYMPUS DIGITAL CAMERA

Here’s what you’ll need:

  • Terra Cotta containers (any paintable container will do)
  • Chalkboard paint
  • Foam paint brush
  • Chalk
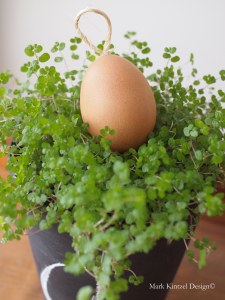
  • Small plant or flower of your choosing (I used Baby’s Tears)
  • Egg (optional)

You can find all of the project ingredients, including terra-cotta pots, at any craft store. Oh, with the exception of live plants and real eggs but you could substitute with artificial. For live plants, visit your local nursery and for eggs, visit your fridge.

Here’s how you do it:

  1. Clean the surface of the container and paint away!
  2. After the paint dries completely, with chalk write or draw anything you want on the surface.
  3. Insert plant or flower.
  4. Your done!

For an added surprise, I placed a simple brown egg that I blew out then glued twine into the hole to hang.

OLYMPUS DIGITAL CAMERA

Here’s how you blow-out an egg:

  1. Using a long stick pin, poke a hole in the top and bottom of the egg and move the pin around to break op the yolk. Make one of the holes a little larger than the other. That’s the hole you’ll insert and glue twine.
  2. Holding the egg in one hand, force the egg contents out by gently blowing into the smaller hole in the egg. The egg insides will come out the other side. Note to crafters – save the insides and make a scrambled egg for yourself – no waste!
  3. After the insides are empty, insert the egg in warm soapy water to clean the inside of the egg. Rinse and let dry on a paper towel.
  4. When dry, insert twine into the larger hole, glue in place and your done!

Happy Crafting and Happy Easter!


My Orchids Tie One On


Here’s my latest creation and invention. My friend Joe owns the best Italian restaurant ever called Roma Ristorante. Joe asked for some flowers for his bar so I picked up these stunning orchids and two glass containers. One very large and a smaller vase to fit inside the larger one. Next I scoured Ebay and found 350 wine corks (Ebay is awesome!) I then dumped the corks between the inner and outer containers and in the inner container, repotted the orchids in organic potting medium for orchids.

It’s important to support the flower stems of orchids but I’m not a big fan of the standard stem clips so to continue the theme, I drilled a quarter-inch hole right through a cork then with a razor blade, sliced it in half (on one side only).   It’s important to leave some wiggle room between the stem and the cork and I found that a quarter-inch drill bit was perfect. Then I placed the cork around the stem and stake. Finally, it’s finished off with some string and I topped off the arrangement with moss. Cheers!

Creative Container Gardening

Many of my unusual items have found a second life as gardening containers. For example, this simple galvanized water pail filled with daisies.

The hanger on this rusty and crusty old sap-gathering bucket came in handy for attaching it to my garden fence, before a miniature rose was added.

Because Impatiens love growing in wire baskets, I removed the disintegrated table top on this side table, made a chicken wire bowl to fit within the opening, lined it with moss and added potting soil and the plants. Voila! A portable garden!

This was my dad’s lunch box. Sorry dad…not a fan of sandwiches so I planted maidenhair ferns in it.

And lastly, my garden-in-a-globe hanging planter. Here’s how you can make your own. With a knife, carefully cut the globe in half. Drill or poke three equidistant holes around the top edge for hanging and one hole in the bottom for drainage. Coat the inside and outside of the globe with a clear weather-resistant finish – Mod Podge Outdoor Glue is fantastic. Reinforce the hanging holes with rivets. Use S-hooks to fasten equal lengths of chain to the holes. Attach the other ends of the chains to another S-hook to serve as a hanger. Place a few light pebbles in the bottom for drainage then add potting soil and plant of your choosing.

So crank up your imagination and start planting your own unique mini-gardens!